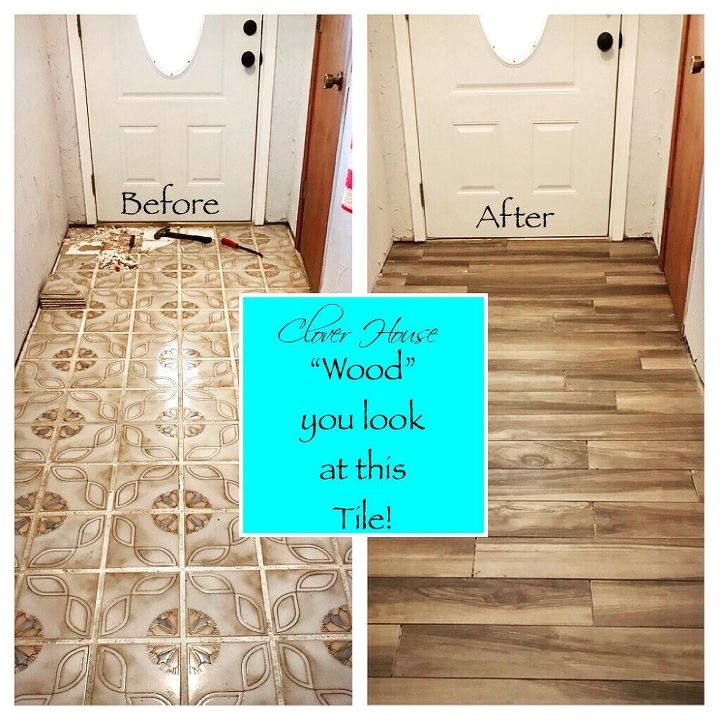
This project, literally was not planned, at all! One morning we are sitting on the couch and my honey says, (pointing into the the entry hall) "let's rip out that floor". Um, ok, then what? lol! I wasn't going to argue with him though because we haven't done a DIY project in forever and I have hated this floor since we moved in 6 years ago!
The before and after is so huge! I still just stop and stare into the hallway and think how much better it looks now. I love it so much!
Note: this picture makes the new tile look way lighter than it is, Instagram filters in action!
This old tile is a terracotta type tile and as you can see it was NOT properly installed to begin with. I believe they must have had a limited amount of tile and just made the grout lines huge to make it all work out. When you walked on it, it sounded hollow. Yall, I just did not like it!
Next, we ran to Lowe's and picked out some tile. I knew I wanted the wood look tiles for sure. I've been drooling over that type tile since it became popular. We bought the tiles for the kitchen/dining room at Lowe's too, so we grabbed a few tiles of that style to compare. You see, some day (soon I hope) we plan on tiling the living room in the same wood look tile, which meets right up to the kitchen/dining room floor, so it kinda needs to look good. The light color tile on the right looked too much like our other tile (top right) so we went with the darker one on the left so there would be a bit of contrast and hopefully look better than blending in with the existing floors.
The first few tiles he laid down looked extremely dark and I immediately got nervous that we had chosen the wrong color tiles. Our home is small and I didn't want it to look smaller by any means!
But as he laid down more tiles, it started to look lighter and I loved it! Even with the spacers still sitting in it, I liked it 100% more than the old tiles that used to be there!
Now for grout, what a messy step! We chose a dark grout this time since the majority of the tiles were dark. We used an un-sanded grout in the shade Mocha U42, also from Lowe's.
We waited the recommended 20 minutes, then started to do the clean up, that was my job and WOW! For such a small space, it was so hard to get this darker grout up. I don't remember it being such a chore in the kitchen area and that was a big space! We had two buckets of water going for quite a while. I used the fan to make the drying process go faster.
You can see the kitchen floor project by visiting our blog and searching "Tiling Our Kitchen Floor".
This is not a good picture because it was late in the day, but believe me when I tell you its so nice and pretty and not hollow sounding when you walk on it! lol!
You may have already noticed that the picture above this one shows the closet door painted, that's another post because I not only painted the door, but all the trim and I totally made the old door hardware match the new front door hardware with a little ORB (Oil Rubbed Bronze) spray paint. Saving those $$$$ yall! Thanks for looking! :)
Visit our blog for even more pictures, details, tips and more posts about tiling!
To see more: http://ourcloverhouse.blogspot.com/2017/08/porcelain-wood-look-tile-floor.html
Suggested Project Book

Original article and pictures take cdn.hometalk.com site


Комментариев нет:
Отправить комментарий