I recently talked about our new memory foam mattress for the master bedroom and moving the "old" mattress into the guest room. However, what I didn't show or tell was that there was no headboard for the guest bed...just a queen sized mattress pushed against a blank wall. This stand-alone mattress did not create the most welcoming guest bedroom, so a new headboard was pushed to the top of my "must-buy" list. I have been on the look out for a headboard ever since and there is one particular style that I keep going back to - a panel headboard with clean lines and routered detail. And after much searching, I found one that I love, but I am not willing to fork over the $420 for:
That is the look I want, but I am a total cheap-o and sometimes that means making it. This headboard is no exception. Yes, I am going to make my own panel headboard. My original DIY plan was to take a raised panel door, ladder style, and turn it on its side for the start of a headboard. That plan failed when my local Habitat ReStore was out of the needed door style. Back to square one. But while leaving the store, I walk past a pile of kitchen cabinet doors...with routered detail, and clean lines. Perfect!
And just so you know, I am not a builder and probably shouldn't be allowed to use power tools without supervision - I get a little too confident and everything gets a good dose of power-tool even if it doesn't need it. Also, this was a trial-and-error build and if I had asked for help, it probably would have been built totally different. (I did this DIY one afternoon before the hubby got home from work. I'm crazy like that.) This is not a step-by-step tutorial...remember, this was trial-and-error.
Step 1 - Measure. Determine how wide the headboard should be. Since I am building this one for a queen mattress, and am going to have the outer posts go all the way to the floor for extra support, my inside (between the posts) measurement is 65". The height measurement is personal preference - how high do you want the headboard to be?

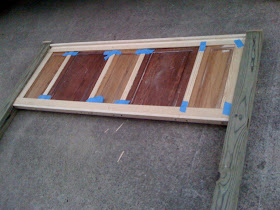
Step 2 - Frame. This frame is the base for the headboard. I built the frame according to the measurements taken in step 1. Lay the frame out square on the ground and screw together. (If you have a nail gun, use it.)
Step 3 - Legs. 4x4 posts make up the legs. Cut them to the wanted height, making sure to measure extra for the top where the caps will go. Secure these to the sides of the frame.

Step 4 - Doors. My cabinet doors had to be cut down to the same length since they were not all the same. Pre-drill holes into the doors so the screws will be counter-sunk. Secure these doors to the frame with screws.
Step 5 - Trim. Put the top header trim in place - I used wood glue. Next put the down trim in place to cover up the space between the cabinet doors and the posts. Finally put the lower trim in place. Next, add the decorative post caps to the top of the posts.

Step 6 - Top Shelf. Final step is to install the top shelf. Cut a 1x4 and place it horizontally on top of the cabinet doors and header trim. Secure.

Step 7 - Caulk and Paint. Here is the headboard with the primer coat. And Paris modeling like a Price Is Right babe. I added two coats of paint to finish it.

I installed my headboard the cheap and easy way. And I wasn't going to wait for help to install it any other way. I screwed some hook-rings to the back of the 4x4 posts and then installed heavy-duty gorilla hooks into the wall. Place the hook-rings onto the gorilla hooks and it is installed. Easy.


There it is. I love the headboard even though it is far from perfect. But for my first DIY alone build, I don't think it is too shabby at all. I think I might cut some from the bottom of the posts so the headboard will go behind the mattress instead of hitting flush with the top of the mattress. Live and learn.
Have you ever built what you wanted to save some money? Or do you bite the bullet and pay for it?
Original article and pictures take remodelthishouse.blogspot.com site
Комментариев нет:
Отправить комментарий