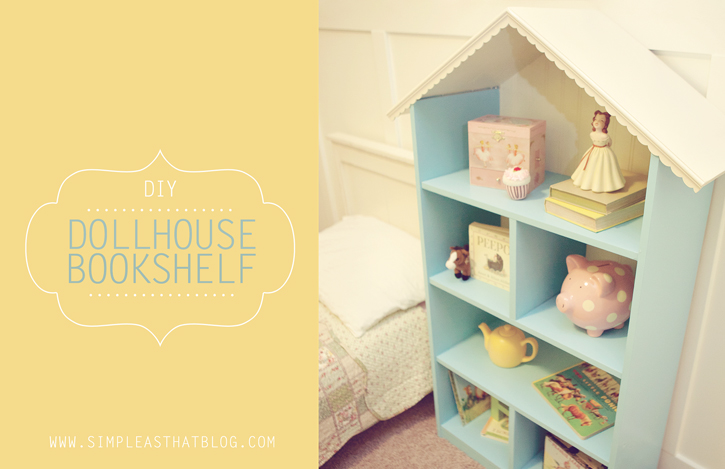
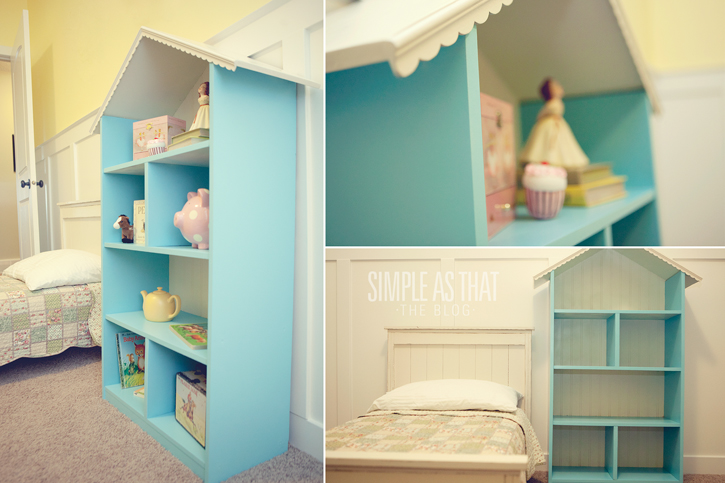
I’ve been so excited to share this little project that my husband and I have been working on for the past week. We converted this bookshelf from Wayfair into a dollhouse/bookshelf for our two youngest girls for Christmas and I just love how it turned out! We’ll be adding dollhouse furniture to it and they’ll use it as a dollhouse, but I think it looks so great as a bookshelf too!
As part of the Wayfair DIY blogger challenge we were given our choice of three different products to transform and we chose this 3 tiered bookshelf. I new exactly what I wanted to do with it before it even arrived and I was super excited to get to work!
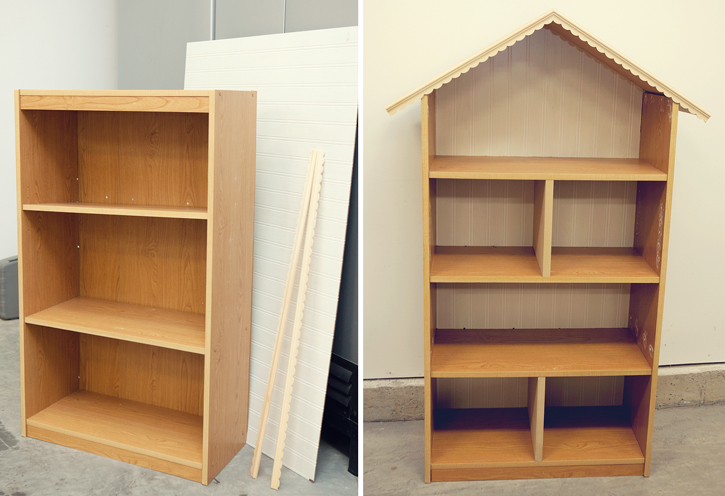
We loosely assembled the bookshelf as we decided exactly how to go about transforming it into a dollhouse. Once we’d decided on a plan of action we got to work and in just a couple of hours we went from this, to this:
Here’s how we did it
We moved each of the shelves on the bookshelf down a few inches so there wouldn’t be any wasted space between the roof and the first shelf. This was a great way to add one more level to our dollhouse creating some extra play room. Use wood glue and spax screws or brad nails to attach shelves.
We then used some scraps of MDF to create the roof and inside partition walls and attached some scallop edging that I purchased at Michael’s to finish off the edge of the roof. We switched out the original backing of the bookshelf with a sheet of wainscot panel.
To save yourself some work taping and masking things off when it comes to final painting, I’d recommend painting the backing and the shelf separately before assembling. I just might be speaking from experience here.

After filling all the holes and lots of sanding, we were ready to give it a coat of primer. We masked off the top of the laminate shelves because I thought they’d look cute as faux hardwood floors in our little dollhouse. We used KILZ primer and it worked great! After some more sanding we were then ready to move on to painting. We used Rust-Oleum satin spray paint on the whole dollhouse and I’m really happy with the finish.

We used aqua for the shelves, antique white for the backing and grey for the roof. Once we were done it just didn’t look quite right. Those faux laminate floors that I thought would look so cute, didn’t, and the grey roof was just too dark for the rest of the house so we gave it another try. After sanding down the top of the shelves and roof we masked things off again and began repainting. We painted the roof antique white and all of the shelves aqua. It turned out so much better and I’m really glad we took the time to repaint even though it took us much longer than anticipated to finish the project because of it. After our painting mishap I learned that its best to keep your colour palette simple.You can scroll down for a few pictures of the final product. I’ve photographed it as a bookshelf, but as mentioned, we’re going to be giving it to our girls for Christmas along with some darling little furniture
so they can use it as a dollhouse. Either way it is cute, cute, cute and our painting mishap aside, it was a relatively straight forward project that can be put together in a week or less. With the repainting on our dollhouse it took us 1 week + 1 day to finish. Total cost {minus the extra paint we had to buy} was the cost of the bookshelf + $50.00 in supplies {spray paint, primer, scallop edging, wainscot panelling} not including things we already had on hand {MDF scraps, wood filler, wood glue, nails/screws, sand paper}.

If you enjoyed this post you might like these other craft + DIY projects from Simple as That:


Original article and pictures take simpleasthatblog.com site
Комментариев нет:
Отправить комментарий