Are you looking for a place to put your cutting boards? I have been storing mine on my counter tops, but I have been wanting to de-clutter the look in my kitchen lately, so I came up with this nifty idea for a DIY Cutting Board Holder that fits neatly behind my cabinet door.

My husband and I are in the process of redoing our kitchen. I have a tiny gallery kitchen and every inch of space in it is important. We just finished making over my kitchen pantry, and changed it from an overstuffed closet to a wonderful walk in pantry. You can read about how we did this here.
Counter space in my kitchen is at a real premium. There are certain appliances that I use all the time and I need to have them out. But having just a few feet of counter space means that anything that takes up room that doesn’t need to means that I have less room to actually use the space. So, even though I use my cutting boards daily, I still wanted them out of the way. As an added plus, once we install a new back splash, we will be able to enjoy the way it looks instead of having it hidden behind plain cutting boards!

As I was pondering my lack of space, the idea of using the back of a cabinet door came to mind, so Richard and I started measuring and cutting and came up with a great little DIY Cutting Board Holder that keeps them very handy, but also gives me back a bit of my much needed counter space.
It’s time to make this DIY Cutting Board Holder.
This tutorial contains affiliate links for your crafting convenience. To make this holder, you will need the following supplies:
- 5 pieces of wood (see measurements below) I used left over trim board wood in a white color but 5/8″ wood will do if you cut it to size.
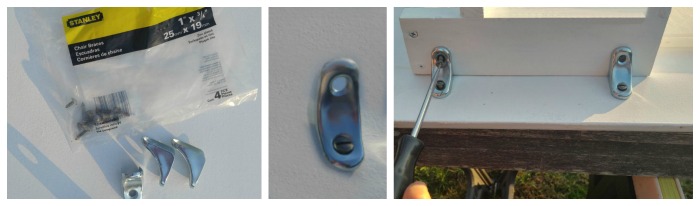
- Stanley chair braces x 4 (1″ x 3/4″) in a zinc finish
- Dimensional stickers with a cooking design.
We had a lot of wood left over from the shelving that we used for the pantry make over, so it was just a question of deciding how large we wanted the holder to be and cutting the wood in those sizes. For my unit the sizes for the pieces of wood were these:
- 2 pieces of 9 1/2″ x 2 1/2″ x 5/8″ for the side edges
- 1 piece of 14 1/4″ x 2 1/2″ x 5/8″ for the bottom edge
- 2 pieces of 14 1/4″ x 5/8″ x 5/8″ for the front holding strips

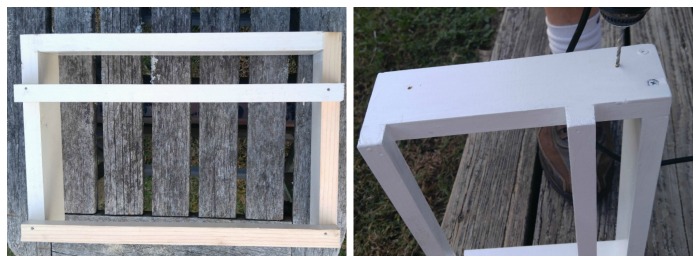
Next we drilled holes for the screws and attached the side pieces to the bottom edge.

The front pieces got attached to the cutting board holder frame with some small nails. A quick measure with a carpenter’s square showed us whether it needed adjusting so that it would sit well on the cabinet door.

Next came a bit of sanding with some sand paper to give the edges a smooth finish and another quick measure with a small spirit level.

It’s almost done! The DIY Cutting Board Holder got a few coats of white paint to match the inside of my cabinet doors. Then we drilled some holes for the brackets that will attach the unit to the cabinet door. At this point, we also removed the cabinet door to make mounting the unit easier.
We used Stanley 1″ x 3/4″ chair braces to attach the DIY Cutting Board Holder to the cabinet door. They had a smooth, rounded look to the and seemed less industrial looking than normal L shaped brackets. Since we had the holes drilled for the screws, it was easy to do. First we attached the braces to the cabinet door, and then to the unit itself.
Ta da!! The DIY Cutting Board Holder is attached. But then I thought “It’s very functional, but not too pretty. What can I do to jazz it up a bit?”

I thought of a few things. At first, I was going to get out some stencils and just hand paint a design on the sides of the DIY Cutting Board Holder. But then I found some adorable dimensional stickers at Michael’s craft store. Amazon also has some similar dimensional stickers here. They were perfect! My set had a Kitchen Aid mixer, some cookies, an apron, a rolling pin and lots of other kitchen designs. How adorable they are and just perfect for my project! This made finishing off the project so much easier and faster than hand painting. Don’t you think?

I played around with the stickers a bit to decide just where to put them and came up with my design. Since these stickers are meant for scrapbook projects and I thought they might not stick well to this painted surface, I decided to use a hot glue gun to attach them to my DIY Cutting Board Holder.

I cut some of the stickers into two and ended up with enough to cover the visible side of the DIY Cutting Board Holder as well as the two front braces. I didn’t worry about the right side, since it will not show when the door is opened to get the cutting boards.

Here is the holder attached to the cabinet doors. It holds my cutting boards and wire baking racks in place, gives me a bit of much needed counter space and looks cute as can be. I am delighted with the way it came out.

Home Decor DIY board on Pinterest.
Where do you store your cutting boards? I’d love to hear about your ideas in the comments below.
Disclosure of Material Connection: Some of the links in the post above are "affiliate links." This means if you click on the link and purchase the item, I will receive a small commission from the sale, but the price is the same for you. I am disclosing this in accordance with the Federal Trade Commission's 16 CFR, Part 255: "Guides Concerning the Use of Endorsements and Testimonials in Advertising."
Original article and pictures take thegardeningcook.com site
Комментариев нет:
Отправить комментарий