Combine dry embossing and watercoloring for a beautiful look.
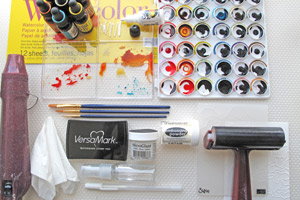
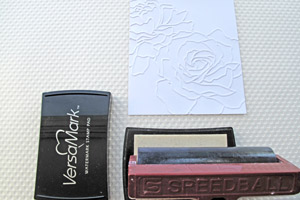
Supplies
Step-by-Step
-
-
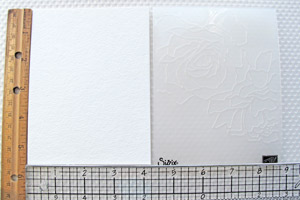
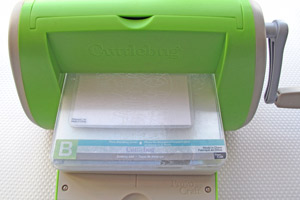
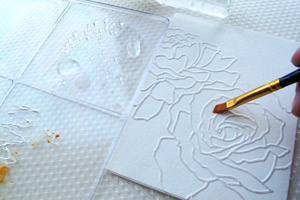
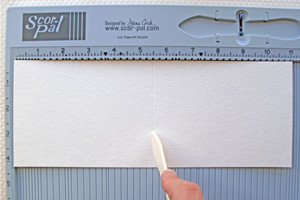
Place the watercolor paper in an embossing folder and run it through your embossing machine. Make two or three passes for a deep impression.
-
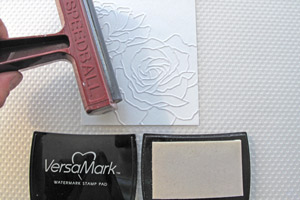
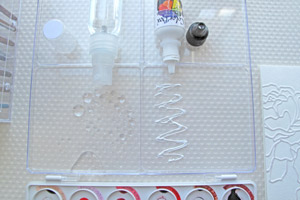
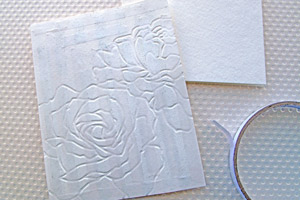
Add temporary adhesive to the back of the image and adhere it to a flat work surface.
-
-
-
-
-

-
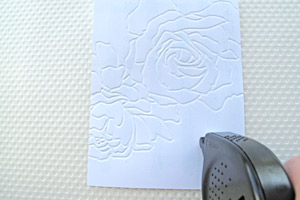
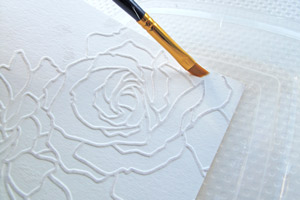
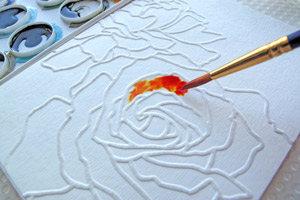
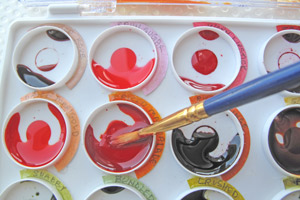
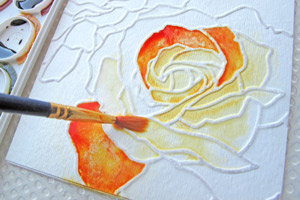
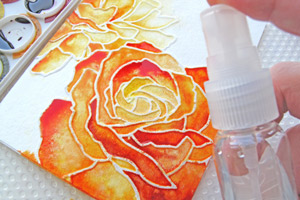
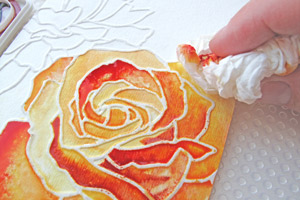
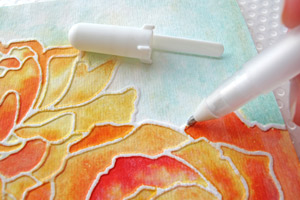
Add color with distress ink, or another medium and a paint brush. Begin by wetting the watercolor paper liberally, so that the ink will bleed out and give a painterly look.
-
-
-
-
-
-
-
-
-

-
-
-
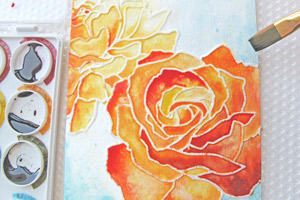
Your card is finished.

Your Turn
You've seen the tutorial, now you try it! We've got a section of the gallery set aside for Distress Watercolor Dry Embossing. Try this technique, then upload your artwork to the gallery. Show us your creations!
Questions and Comments
We'd love to get your feedback or questions. Leave your comment below.
Thanks for the wonderful tutorial Mel. I would love to give it a try. The effect is stunning
What a great effect and a brilliant first tutorial - very easy to follow. Thanks Mel.
Gorgeous - can't wait to try it. Congratulations on a great tutorial, Mel. More please!
This is a wonderful technique and card(s), Thanks so much for sharing such wonderful photos and instructions.
Mel, glad to see you here! LOVE your work....thanks much. God bless you
Beautiful..have this on my next "to do for me!!" list..thanks Ines
Beautiful! I love using the embossing folder to get an image to work with, versatility is helpful!
Wow! That is so beautiful. When I saw the card I didn't think I could do that as it looked difficult. Now, I can't wait to try it.
Not only is it beautiful but it looks like so much fun to make playing with colors!
Wow Wow Wow This is absolutely gorgeous Mel Like the others I'd LOVE to have a go at this. Thank you so much for this xXx ;0)
this is just what I love doing, it's so good to have a challenge like this, thanks heaps
Combine dry embossing and watercoloring for a beautiful look.
Supplies
Step-by-Step
-
-
Place the watercolor paper in an embossing folder and run it through your embossing machine. Make two or three passes for a deep impression.
-
Add temporary adhesive to the back of the image and adhere it to a flat work surface.
-
-
-
-
-
-
Add color with distress ink, or another medium and a paint brush. Begin by wetting the watercolor paper liberally, so that the ink will bleed out and give a painterly look.
-
-
-
-
-
-
-
-
-
-
-
-
Your card is finished.
Your Turn
You've seen the tutorial, now you try it! We've got a section of the gallery set aside for Distress Watercolor Dry Embossing. Try this technique, then upload your artwork to the gallery. Show us your creations!
Questions and Comments
We'd love to get your feedback or questions. Leave your comment below.
Thanks for this great tutorial, I have that embossing folder and have been looking for more ways to get more use from it. This one you've shared with us is just fabulous.
Thanks again.
Wow, your card is gorgeous. Love this technique and can't wait to give it a try. I hope you will be sharing more techniques soon.
What an amazing technique! The results are stunning. Thank you for the fantastic tutorial, Mel!
Thanks for the great tutorial. I will try that out right away ... the effect is stunning. ))
This is such a beautiful technique! Thank you for sharing - can't wait to give it a try! Gorgeous cards!!!
Just love this, will have to try, may even change my next class plan so I can share it, will credit you with tutorial, many thanks
This is a great tutorial...I am definitely going to try this with my embossing folders!
My girl Mel is all grown up know and posting tutorials on SCS...sniff! To think I knew you "when"! And of course, a brill job..you are always so thorough!
What an awesome technique. I have done something similiar with vellum paper and ink, but this is really good!
Oh thanks for this it is Breathtaking! So love the technique.
Wonderful tutorial. How would this technique look with gold or silver embossing powder or even on black paper? Hmmmm......must try it all!
Combine dry embossing and watercoloring for a beautiful look.
Supplies
Step-by-Step
-
-
Place the watercolor paper in an embossing folder and run it through your embossing machine. Make two or three passes for a deep impression.
-
Add temporary adhesive to the back of the image and adhere it to a flat work surface.
-
-
-
-
-
-
Add color with distress ink, or another medium and a paint brush. Begin by wetting the watercolor paper liberally, so that the ink will bleed out and give a painterly look.
-
-
-
-
-
-
-
-
-
-
-
-
Your card is finished.
Your Turn
You've seen the tutorial, now you try it! We've got a section of the gallery set aside for Distress Watercolor Dry Embossing. Try this technique, then upload your artwork to the gallery. Show us your creations!
Questions and Comments
We'd love to get your feedback or questions. Leave your comment below.
LOVE this technique! Also love the way you color-labeled your Tim Holtz palette: am gonna do the exact same thing. Would love to know what you mean by the White 'pigment ink'. Would that be an acrylic ink? A brand name would certainly be helpful. Thanks!
What a stunning card!! This was a great tutorial. I really liked that it had step by step instructions along with the pictures. That's always a big visual help. I can't wait to try this technique with the distress inks.
Julie and Lorna,
The video will be posted soon. Michele has never shot a video before and didn't get one done in time (one she liked sharing with us all. I can totally relate. I had to re-shoot my first video gazillion times). Thanks for your patience.
Hugs and smiles
Fabulous, just trying this technique now...many thanks for sharing...hugs..x
This is so gorgeous, I can't wait to try it out.
Thank you so much for your awesome tutorial. It is fantastic. I love this card so much. It is so beautiful and I am so happy to find out how to do this technique. Fantastic work all around.
Thank you.
Thanks so much for such a clear tutorial. Can hardly wait to try this
Combine dry embossing and watercoloring for a beautiful look.
Supplies
Step-by-Step
-
-
Place the watercolor paper in an embossing folder and run it through your embossing machine. Make two or three passes for a deep impression.
-
Add temporary adhesive to the back of the image and adhere it to a flat work surface.
-
-
-
-
-
-
Add color with distress ink, or another medium and a paint brush. Begin by wetting the watercolor paper liberally, so that the ink will bleed out and give a painterly look.
-
-
-
-
-
-
-
-
-
-
-
-
Your card is finished.
Your Turn
You've seen the tutorial, now you try it! We've got a section of the gallery set aside for Distress Watercolor Dry Embossing. Try this technique, then upload your artwork to the gallery. Show us your creations!
Questions and Comments
We'd love to get your feedback or questions. Leave your comment below.
This is so gorgeous I can't wait to try it
This is absolutely beautiful! Can hardly wait to try it. What embossing folder did you use?
This is awesome! Great color choice for the flower!! Wondering how else to add the embossing powder when I dont have a brayer!! This looks fantastic! Thank you for the tutorial on this!!!
Very nice! I can't wait to try this method. Thanks for the tutorial.
This is a beautiful card. I noticed the palette you used for your distress inks. Your labels are a great idea. Where did you find this palette? I use my inks often and would like to have a palette just like this. Happy creating!
Never mind...I googled it, and now I get it! BTW...that card is gorgeous!
I love this!!!! Thanks so much for sharing! I have seen other cards that had this technique, but could never figure out how it was done. This is one of those cards the receiver will come back and say; "I framed your card."
That's what makes me love making cards.
Thanks again for sharing.
This card is soooo BEAUTIFUL. Once my room is cleaned up, I can make some of these. Thanks for the clear information
Absolutely STUNNING!!! I need to go see what else you've been up to on your blog! Thank you for sharing this masterpiece...seriously...WOW!!!
Kept trying to get here to see this tutorial...wow!!! I'm so wishing I had that embossing folder that I have to go order it! Beautiful work:)
Just love this Mel! I am itching to try it but won't get back to all my stuff till holidays finish in September. And I have that folder and a CB and most other things so keen to get going. Don't have watercolour paper though, hope it's easy enough to get although I suppose using artist type paper and water might work.
Well done!
Absolutely beautiful!! Great tutorial!! Thank you for sharing your lovely work, one of my favorite techniques: watercoloring.
so awesome Mel! thanks for a fabulous tutorial- i can't wait to try it!!
Combine dry embossing and watercoloring for a beautiful look.
Supplies
Step-by-Step
-
-
Place the watercolor paper in an embossing folder and run it through your embossing machine. Make two or three passes for a deep impression.
-
Add temporary adhesive to the back of the image and adhere it to a flat work surface.
-
-
-
-
-
-
Add color with distress ink, or another medium and a paint brush. Begin by wetting the watercolor paper liberally, so that the ink will bleed out and give a painterly look.
-
-
-
-
-
-
-
-
-
-
-
-
Your card is finished.
Your Turn
You've seen the tutorial, now you try it! We've got a section of the gallery set aside for Distress Watercolor Dry Embossing. Try this technique, then upload your artwork to the gallery. Show us your creations!
Questions and Comments
We'd love to get your feedback or questions. Leave your comment below.
Using the brayer to apply versamark to the raised portion of a dry embossed image is brilliant! I can't wait to try that!
What a fabulous tutorial! Thank you for the great photos with the very clear directions! I can't wait to try this!
Is there a specific way that I should get the clear embossing powder off the brayer? I have not used my brayer yet, even though I have had it for about 10 years!
He IS Able!
Traci S.
Oh Mel, hyou have outdone yourself again. Thank you so much for this terrific tutorial, including all the little tips along the way
merci pour ce tuto - je n'ai encore jamais essayé cette technique et je ne savais pas trop à quoi servait ce "brayer".. si ce n'est à aplatir le papier.. je n'aurais pas eu l'idée de m'en servir pour tamponner l'encre - mais je suis débutante !
j'ai hâte d'essayer ! merci beaucoup pour ce partage, il me permet d'apprendre ! amitiés de France
Mel, your creativity is awe inspiring.Your tutorials are so articulate and thorough. I love how you show alternatives and possibilities. Love it!
Thanks for sharing this particular gorgeous technique. I noticed on your plastic palette wells, the names of the color was in a half circle around the well. How did you create those labels?
I LOVE, LOVE, LOVE this...can't wait to try! Thanks so much for sharing. Just beautiful!
A very beautiful card. I can't wait to try this.
Hi Judi, Thank You oh so much! I made the labels using two circle punches. It's all described here: http://melstampz.blogspot.ca/2012/05/distress-ink-watercolour-trick-labeling.html Next time I would add even more lacquer glue to protect them from ink, because I'm very spill-y.
Hi Traci, Thanks! The rubber brayer is just used to apply a nice layer of Versamark ink, so hopefully it won't get any embossing powder on it, but I find brayers are so easy to clean. I just use warm water in the sink & soap or stamp cleaner if the mess is really bad. Thankfully Versamark ink will just condition your brayer and make it last longer, so no need to worry about how clean it gets after this. :o)
Hi Pam, You could also use a versamarker or any brand of embossing marker to just draw the lines on the raised areas. Might make it easier for those who don't have brayers or for anyone who doesn't want to have to spend time brushing off extra embossing powder. :o)
What a lovely technique. I cannot wait to try it.
a very lovely technique and I might try it tomorrow.
Combine dry embossing and watercoloring for a beautiful look.
Supplies
Step-by-Step
-
-
Place the watercolor paper in an embossing folder and run it through your embossing machine. Make two or three passes for a deep impression.
-
Add temporary adhesive to the back of the image and adhere it to a flat work surface.
-
-
-
-
-
-
Add color with distress ink, or another medium and a paint brush. Begin by wetting the watercolor paper liberally, so that the ink will bleed out and give a painterly look.
-
-
-
-
-
-
-
-
-
-
-
-
Your card is finished.
Your Turn
You've seen the tutorial, now you try it! We've got a section of the gallery set aside for Distress Watercolor Dry Embossing. Try this technique, then upload your artwork to the gallery. Show us your creations!
Original article and pictures take www.splitcoaststampers.com site
Комментариев нет:
Отправить комментарий