Edited July 2011
I have a new way to attach the sides to the headboard. You can see my latest Bench Tutorials in my post Twin Headboard Bench “Welcome” and Twin Headboard Bench Tutorial

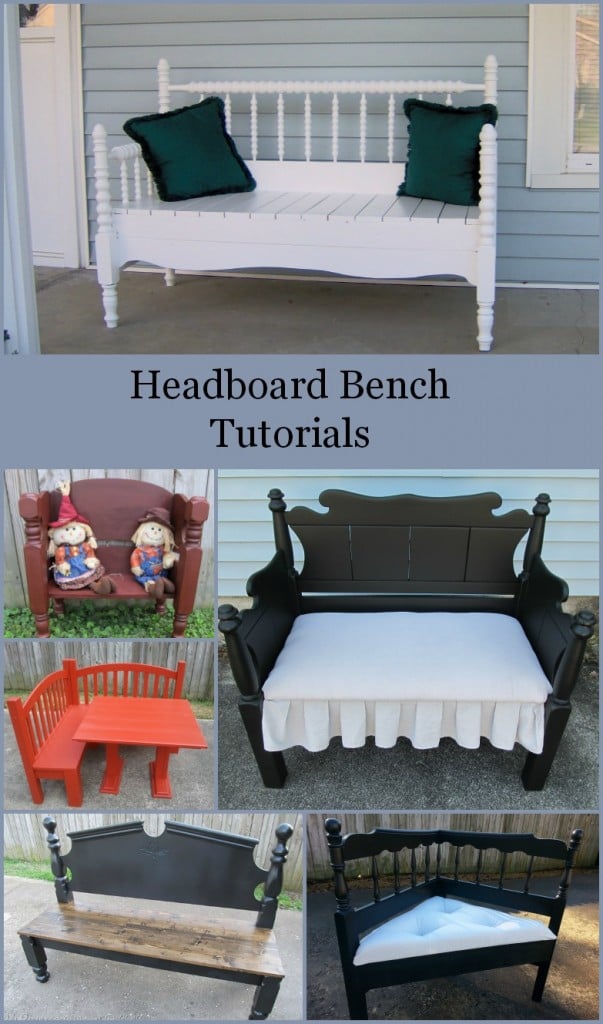
Some people have written me asking about how to make these headboard benches. When we (Cathy and me) made these benches, I had NO idea that I would EVER be BLOGGING! Therefore I didn’t take a lot of “in process” pictures. However, someone expressed interest in buying this bench and asked for closeup pictures, so I will try to explain what we did and why.
With this particular bed we had a matching full sized headboard and foot board. We initially cut the foot board in half on the table saw. But, in my opinion when you only cut it in half, it makes the seat too deep. We ended up taking off enough on each end of the foot board to make it about 18-19 inches deep.


To accomplish this we used Cathy’s drill press with a sanding disc attached to it. That gave us a nice little inward curve to fit great against the front of the headboard.


Across the back of the headboard (bottom) we attached a 1x the length of the bed. It is located below the 2×4
The board in the front is a 1x that we gave a little detail by cutting it with a jig saw. We had a curbed piece of cornice work that we used for a pattern.

In this picture you can see that we attached the 1x to the sides (foot board cut in half) You can also see that we used L brackets for extra support. After making the initial construction, we decided the bench sat too low. We constructed a basic box and stacked it onto the 1x and the original foot board (sides) You can see the stacked construction in the picture below.


In the picture below, you can see that a 2×4 is stacked on top of the curved 1x

You can see how pretty a piece can be with the end result. Only you know the challenges or oops you have during a particular project. That is… unless you blog about it to the world, showing closeup pictures, so others may not make the mistakes you make.
Now on to another bench:
We picked this up from the curb. It was the entire bed, rails, slats, everything. I wondered if it were possibly a divorced or newly married (previously divorced) couple. You know… I’m NOT sleeping in her bed sort of thing.
Again, we cut the foot board in half on the table saw, then cut each half again to make the seat about 18-19 inches deep.

After cutting the foot board, the next step is to line them up to make the sides of the bench.
This is where Cathy wants to do it one way and Gail wants to do it another way. I have seen benches that the sides were brought out and attached against the side of the headboard. In that scenario you would be putting the screws through a board approximately 3/4 inch thick into the headboard post which is about 2.5 inches thick. Cathy doesn’t think they look as nice, and hindsight, I suppose I agree. (she doesn’t read my blog, so shhhh if you don’t tell her, she will never know!)
So, we do it her way. It’s not easy to do the drilling of the pilot holes. I will attempt to explain how we went about it.
We bought an extra long drill bit. Which is over kill for sure. But you will need a bit that will drill through a bed post.
Place the side (cut foot board) against the headboard and mark the thickness of wood. Drill several holes (from front to back)
Line the side (cut foot board) back up (clamping if necessary) and drill from the back to the front only slightly into the side (cut foot board)
Take the side (cut foot board) off and make sure that you are pretty much in the center of the board. Then while unattached, drill a pilot hole into the side board using the holes you just slightly drilled as guides.
Apply glue and using your marks line the two pieces up and clamp and screw.
We used 2×4 braces in the middle for extra support.

In this picture you can see that we made a 2×4 box to stack onto the original construction. We puttied the slat holes. As you can see we laid our slats from side to side on this bench as opposed to the previous bench where we laid them front to back.


We picked up this footboard at a local peddler’s mall for $6.00. This was before we realized there were better places to find old, orphaned beds….curb shopping is much cheaper.


We adorned it with a handle in the front to give it a faux drawer look. These corner benches are fairly easy to make, and much easier to move from one place to another.
Now I’ll show you the easier way to attach the sides (foot board cut in half)

This was a twin bed. We cut the foot board in half on the table saw. You can see that we laid the foot board up against the side of the headboard. (gail’s way) We glued and screwed through the foot board into the headboard.


We sink all of our screws that will be visible
We putty over our screw holes and screws
We ALWAYS drill pilot holes
We use my nail gun for attaching the seats/slats. If we don’t use tongue and groove flooring, we use paint sticks or yard sticks to get equal separation of the slats.
Sometimes we use the right side of the flooring unpainted, other times we sand the shine off the flooring and paint the flooring to match the bench.
Almost all of our headboards and/or foot boards have been curb finds. If curb shopping isn’t illegal in your area, I suggest you check out your .gov site and find out when the large trash pickup day is. Our metro area has them about 3-4 times a year, rotating the neighborhoods. That means that curb shopping is available most months.
Save
You can check out all of my headboard benches and more.
Edited to add: If you have a blog and you learned something from this tutorial, I would greatly appreciate a link back. This is one of my most searched topics. If you don’t have a blog and you learned something, drop me an e-mail at MyRepurposedLife@gmail.com and I will gladly blog brag about your bench to the world
Original article and pictures take www.myrepurposedlife.com site
Комментариев нет:
Отправить комментарий